
 I decided to start on valentine favors for my granddaughters preschool class. so I came up
with these paper mailboxes which I am going to fill with candy kisses later. to start cut a retangle 5 by 10
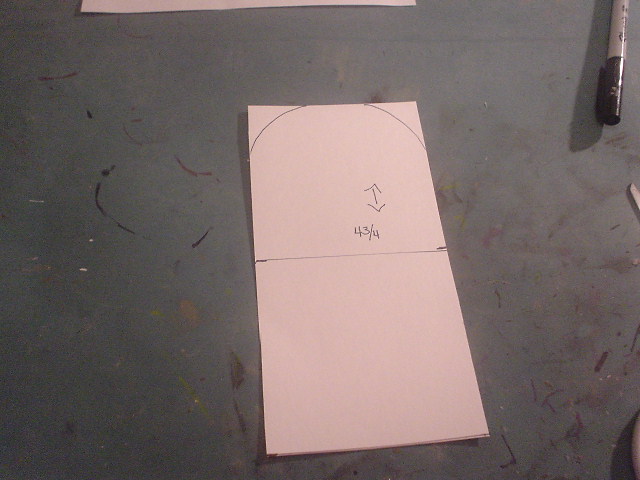 as you see here i have marked it to round off for the end of mailbox this will be the bottom and back of mailbox I cut some of the bottom off so it will measure 8 and a half long
 clip all around the rounded end so you can turn in.
 fold on sides and the slits and fold a crease
 take your 5 by 10 retangle and glue to your base it will look like this
 this is what back looks like glued
 now for mailbox lid cut 5 and a half and round off like before
 fold a crease and bottom and cut out on ends like above
 now glue to bottom of mailbox
 now close and cut around to make a neater and tighter look this is what it looks like before cut
 now to keep closed I cut strip of paper glued to top and strip for mailbox to go though strip
 here is a finished one I did. for flag I used doodle charm cut 6in and bug is from create a critter cut at 3 and a half inched These are super easy I made 17 of them. I plan on putting kisses in them and a little letter which will say heres a special delivery
just for you, luv bug kisses! happy valentines day. I know how some of you like to make
things for your children for school I thought I would give you plenty of time to use this if you want. cheaper than the ones at target. ha

heres the side look

heres the envelopes I made cut at 3in doodle charm lips are from indie art cut 1 and a half
embossed with heart folder

here is the back with the little letter about luv bug kisses

heres a few I made out of different color papers not one is the same you can make one mailbox with one sheet of 12 by 12 paper

here is the back with the little letter about luv bug kisses

heres a few I made out of different color papers not one is the same you can make one mailbox with one sheet of 12 by 12 paper
Hi Rhonda, These mailboxes are so darn CUTE!!!! Love them!!
ReplyDeleteThese turned out so cute!!! Thanks for the picture tutorial!
ReplyDeleteOH MY WORD!!!! Those are simply adorable!!!!!!!! So cute, TFS Rhonda!!! :)
ReplyDeleteThese are very cute. Thanks for the wonderful tutorial.
ReplyDeleteThese are sooo cute. I just love them. What a fabulous gift. I think it would be so cute to make one for my daughter for her room, and then I could put little notes in it for her. Thanks for the great tutorial.:) Hope you are well.
ReplyDeleteStephanie
Thanks so much for the step by step, I so need that. These are just so darn cute! I love them. What a great idea and I am sure the kids will love them too!! You have been busy!!
ReplyDeleteOh wow these are absolutely adorable.
ReplyDeleteRhonda....your mailboxes are soooo stinkin' cute! I love them and I think the kiddos will too.
ReplyDeleteThese are so cute !!! They will love them.
ReplyDeleteThank you so much for the tut :)
Hi, Rhonda!!! This little box is adorable (and I love boxes!)!!! And thanks for the instructions -- I know I'll be doing several of these!
ReplyDeleteMy friend, I love your new look! I tried to visit Monday evening but several blogs I went to would just hang -- I don't know what was going on!
Anyway, missed you and glad to be back to see all your wonderful creations!!!
Super fun! Love the lips!
ReplyDeleteLove the little letter on the inside! The kiddies are going to love these!
ReplyDeleteTara
Those are terrific!! You make it look so easy-I'm almost tempted to try it. Almost LOL!
ReplyDeleteSuper adorable. Happy New Year to ya! :)
ReplyDeleteThese are the cutest mailboxes....The kiddies are going to love them! Happy New Year Rhonda!
ReplyDeletesmiles...Tammy
Wow Rhonda! These mailboxes are adorable1 I gotta try this. I wanted the Valentines solution cartridge just because it has a mailbox, but I resisted the temptation. I'll try this though! TFS! Great job! I'm your newest follower. Happy New Year!
ReplyDeleteThese are AMAZING!! Wow!! Thanks for all the instructions too. My favourite part are the little flags at the side. What a great touch!
ReplyDeleteRhonda you always amaze me! LOVE these!
ReplyDelete